In this tutorial GIMP 2.6 is used, the tutorial takes about 10 minutes to finnish.
This is the result:

Part 1: Outline
- Create a new document, the size of it doesn't really matter. Mine is 800x600 pixels.
- Select the text tool from the Toolbox and choose a font of your choice and write anything you want. I chose the “Liberation Sans Bold” font, fontsize 45.
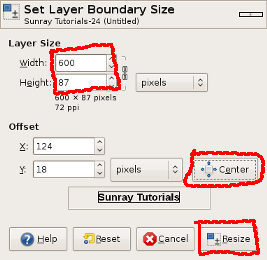
- In the “Layers” window, right click your new text layer and choose “Set layer boundary size”. Set the width to 600 and the height to 87. Then you click on the “Center” button. To perform the task and close the dialog, press “Resize”.
- Now duplicate your layer (Right-click and choose “Duplicate Layer”) and rename it to “White” (Double-click and write). Right-click the layer and choose “Alpha to selection”.
- In your document window, click “Select” and then “Grow...”. I chose 2 pixels growth (but that depends on what font size you have).
- Now in the same window, click “Edit” and then “Fill with BG color”, in this case it should be white, if it isn't change it to white and redo the step
- Duplicate the layer and rename it to “Black”. Right click the layer and choose “Alpha to selection”.
- Now you'll grow the selection 2 pixels again. Click “Select”, in your document window and then “Grow...”.
- Click the “Edit” button and then “Fill with FG color”, it should be black or else change it and redo the step.
- Now change the layer order, The original text layer on top, second should be “White” and third “Black”.
Congratulations, now you have created a text with a fancy outline!
Now we're moving ahead, down below the mirror effect is explained.
Part 2: Mirror
- Duplicate each one of your layers (Original text layer, “White” and “Black”) and make them one solid one called “Mirror”.
- Do this by duplicating each layer, put them next to each other on top of the three original ones and then right click on the top one, choose “Merge down”. Do it twice and your done, don't forget to rename it though.

- In you main document window, click on “Layer”->”Transform”->”Flip vertically”.
- Now choose the “Move Tool” from your “Toolbox” and, after you clicked and press down “CTRL” (then the layer will go straight down), drag the layer down so only the edges of the layers touch. Then move the layer down in the layer list, should be fourth in the list, just above the “Background” layer.
- Choose the “Blend tool” in your “Toolbox”. In the tool properties, set the gradient to “FG to Transparent”. Then set your foreground color to white.
- Hold down “CTRL” and start your blend from the middle of the “Mirror” layer and then drag the line upwards to the middle of your original outline text layer(s).
Congratulations once again! You're done!
Please leave a comment if you like this tutorial.
Here is my final result:


Good instructions; very straightforward. Thanks!
ReplyDeletethis is a really well done tutorial .... keep up the great work :)
ReplyDeleteI really enjoyed this tutorial.. it was straight forward and easy to follow. I tried to make one as a transparent and it worked until I got to the blending. Maybe it just doesn't work for transparencies. Thank you for your work here...
ReplyDeletethank u youve helped so much!
ReplyDeletere: January 23, 2009:
ReplyDeletesame thing happened here; try selecting the layer before doing the blend (Select > All), that seems to work.
Thank you, thank you! You are a Gimp angel! Very straightforward and step-by-step. As for making the image transparent, here's what I did. I am absolutely POSITIVE that there is an easier way, but here goes:
ReplyDelete1. After saving the image as a .png image, I reopened it.
2. I cropped the image.
3. I selected the image and removed the alpha (layer, transparency, remove alpha).
4. I re-selected again and again went to layer-transparency-add alpha.
5. Then go to edit-clear.
Re-save (i name these with the original name plus transparency and keep the original...just in case).
That's it!
Great instructions shared through this post. Thanks for sharing.
ReplyDeleteRegards,
clipping path
Great tutorial! But the last step of part 2 (blending) didn't work for me :/
ReplyDeleteDon't know what I did wrong?!
Go to the 'select' tab and choose 'none' before doing --> "5.Choose the “Blend tool” in your “Toolbox”. In the tool properties, set the gradient to “FG to Transparent”. Then set your foreground color to white."
ReplyDeleteit didnt seem to work for me either but when i selected none it did work, thx for the great tutorial!
Yep very excellent tutorial. Loved Gimp more than any Adobe products. Keep up the good work!!!
ReplyDeleteVery nice tutorial. Thanks for all the time you've put into it!
ReplyDeleteReally good tutorial good jooooob nice work...
ReplyDeleteyou're a boss
Sorry I got a bit confused at the blending bit could you give more information?
ReplyDeleteAny ideas on the blending part of the tutorial? I did create the mirror but it seems to be filled with a solid colour instead of a proper transparent gradient form. I could not manage to make the proper 'mirror' of the original text.
ReplyDeleteaszfsdg
ReplyDeleteI tried to apply this at home but I don't know why it doesn't work, maybe I'm doing something wrong I'd like you giving me a little explanation because it happens when I click on the “Center” button. Thanks so much.
ReplyDeleteFound a much easier & automated way to make gimp text outline:
ReplyDeletehttp://registry.gimp.org/node/186
Really good tutorial. thanks
ReplyDeletenice tutorial..
ReplyDeletevery cool thank you
ReplyDeleteI recently came across your blog and have been reading along. I thought I would leave my first comment. I don't know what to say except that I have enjoyed reading. Nice blog. I will keep visiting.
ReplyDeleteThank you! :-)
ReplyDeleteThanks for the good things that holiday we are very grateful to gclub the sentence.ibcbet
ReplyDeleteเว็บเดิมพันเกมส์กีฬาฟุตบอลออนไลน์ คอมมิชชั่นX2 คาสิโนคืน 5% จากยอดเสีย
บาคาร่า แทงบอล ผลบอล 7m
Which one's FG to transparent in the tools options? You can just tell if it's the 4th or 5th etc.
ReplyDeleteThanks for the good things.
ReplyDeleteThank you for tutorial, it is possible to use "Perspective Reflection" script for automatic work.
ReplyDeleteUnfortunately all the tutorials and scripts works only for very simple line- mirroring.
The really nice effect is to do real mirroring of the object. As if you place an object on mirror. Then you do not have reflection at the end of the mirror (bottom line of the picture) but around all the object (similar to mask).
My question therefore is: is someone able to do with Gimp this efect of real mirroring?
Thank you for help.
Jan.
Thank you very much for this tutorial, nice, well explained and easy to follow!
ReplyDeleteThank you very much for this tutorial, nice, well explained and easy to follow!
ReplyDeleteShare this,, Obat Bintik merah dan Gatal-gatal your Obat Fety liver me Obat Stroke her Obat Pegal-pegal her Obat Gusi Bengkak thank you verry much for permission
ReplyDelete